

How-to: create your own financial approval with the Conditional feature

The Conditionals feature for the Approval Path creates many possibilities for more complex automation. With it, you can control processes without wasting time and energy analyzing what should happen next. You can set it up once and forget about manual management of approvals.
One of the setups we know is often used is financial approval. Let’s look at a scenario:
The marketing team needs a new camera and photo editing software budget. These expenses can be quite high but often necessary. They create a new ticket in Jira to get the ball rolling on the process.
Now, instead of tediously contacting every decisional colleague, bouncing back and forth between people, they just input the estimated budget in the ticket and start the approval, being free to do other, more pressing things.
Depending on the size of the expense, the approval gets directed to the appropriate people. If the budget exceeds a certain amount, it goes to upper management. If it is below this amount, it goes to the marketing director. With this setup, the issue is resolved quickly. But how do we create such seamless and elegant approval?
A quick explanation of Jira Expressions
Jira expressions are a powerful feature within Jira that enables users to write and evaluate custom expressions. These expressions are made with domain-specific language, allowing for the manipulation of issue fields, the evaluation of logical conditions, and the execution of specific actions based on those conditions.
By integrating Jira expressions into their projects, users can create more dynamic and responsive workflows that adapt to the needs of their teams and projects, streamlining processes and improving overall productivity.
It’s worth going through the official Jira documentation to use Jira expressions effectively, as the possibilities are huge in what you can achieve by combining them with the Approval Path.
How to get it done
Setting up a custom field
First off, we need an appropriate custom field from which we will take the data. If you already have a field for a budget or know how to create one, you can skip this part. If not, navigate to:
- Settings → Issues in the top-right corner of your Jira
- Go to Custom Fields on the left side
- Click Create Custom Field in the top-right corner
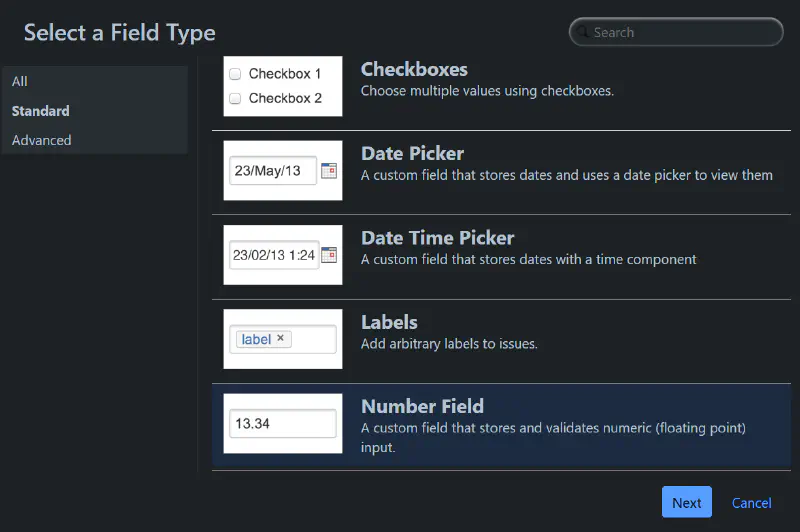
There, you can choose the type of field you want to make. For our example, “Number Field” is the best choice.
Now we have to add the custom field to the issue. To do that, go to:
- Settings → Projects
- On the project in which you want to have the field added, click the three dots on the right under “More actions” and select “Project settings”
- Click on the issue types on the left. Here, you can add the custom field to an existing issue type or create a new one.
With that done, we can move on to creating the conditions themselves.
Getting custom field’s ID
The fastest way to find the custom field’s ID is to create/open a ticket where the custom field is added, right-click it and inspect it. We will need an issue with the field setup later, so ensure you have one. What we’re looking for is this:
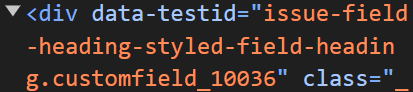
Here, you can see the string containing the ID, which is the last digits of the string: issue-field-heading-styled-field-heading.customfield_10036
So, in this case, it will be 10036, which will be different on your instance. It will be needed in a moment.
Creating the conditions
This is where the real magic happens. To get started:
-
Go to Approval Path on the left side of your project and navigate to Conditions
-
Click on “Add Conditions”
The first condition we will create is to check if the estimated budget field has a value- we can’t ask for a budget to be approved if there’s no budget set.
So, our first Jira expression will be “issue.customfield_10036 != null”, which means “check if a custom field with ID 10036 is not empty (null)”. If the field isn’t empty, the approval will start. If it is empty, it won’t work.

This is the moment when the aforementioned ticket will come in handy. Before you start using the conditionals, you can test them!
To do so, use the search bar to find the issue containing the custom field, then click “Test”. Depending on whether the field is empty or not, you will get one of these two messages:


After you prepare the condition and ensure it works, you can save it, and we can move on to creating the condition for different approvers.
Because we previously learned the basics of creating conditions, this is a very straightforward process:
First, we create a new condition and name it appropriately. For example, “Marketing budget approval below x”. In the expression field, we input “issue.customfield_10036 < x”, where “x” is the amount you want to set. This expression checks if the amount is less than “x”. Remember, your issue ID will be different from 10036! You can test it once again to make sure it fires properly.

Next, we create the second bracket. This one will be for a budget equal to or higher than “x”. The expression will be “issue.customfield_10036 >= x”. The important thing here is to add the “=” sign. We have to take into account the exact number.

For example, if we set the budget to 10 000 and the expressions are “> 10 000” and “< 10 000”, the approval won’t trigger. The first expression will trigger for anything above 10k and the second for anything below 10k- but not for exactly 10k.
If you would like to make additional brackets, the syntax looks like this: if, for example, you want to check if the budget is between 10 000 and 15 00, you use “issue.customfield_10036 >= 10000 && issue.customfield_10036 <= 15000”. You combine two expressions with “&&” which means “and”. So here we have “check if the custom field is greater or equal to 10 000 AND if the custom field is less or equal to “15 000”.

And voila! We have made the basic financial approval conditions. Now, the last step.
Setting up the approval
For this last part, we want to navigate to the Definitions section in the Approval Path extension and add a new definition.
First, let’s set the approval start condition. Click on the search bar, type in the name and select the condition, checking if the field has a value.

For the sake of simplicity, we will make only two steps in total: one for the lower budget bracket and one for the higher cost. You can add as many steps as you need.
Add a step. Select the right type of step depending on your needs- if there is a specific approver, one from a group, etc. Here, we will create a single-user step.

Here, you can select a user/users from whom the approval must continue. Select the create step condition, add the appropriate budget bracket, and then hit Add.

Repeat the process for each step which requires a specific condition.
When you’re done with all the steps, hit Save.
And that’s it! Now you can go to any ticket requiring this approval, launch it and see the magic happen right before your eyes! The possibilities for approvals, financial or not, in combination with conditionals in Approval Path for Jira are endless. You can automate and simplify a great portion of your processes and make work much more efficient.
If you have any other questions, try our documentation or contact us via our support portal.
Enjoy your smooth approvals with Approval Path for Jira!