

How to Share Jira with External Users (Securely)

As Jira grows ever more ubiquitous, it’s increasingly necessary for larger and more diverse groups to communicate and collaborate on projects in real-time. The ancients’ rituals of emailing screenshots are embarrassingly outdated for software-enabled teams that bought Jira to avoid email-chain siloes and the disheartening disaster of discovering efforts have been duplicated due to a lack of real-time project management.
Fear not!
There are three options for collaborating securely with external users in Jira:
- Give them an account to access to your Jira.
- Use iDalko’s Exalate
- Use External Share for Jira
For each we’ll cover:
- The security considerations
- The pros and cons
- Who they are best suited for
Option 1: Give them an account to access your Jira
The first option to consider seems the most straightforward. Give the individual access to your Jira by buying them a license.
Security considerations
These vary heavily depending on who you’re sharing access with and what you’re storing on your Jira.
If you’re sure there’s nothing you wouldn’t mind an outsider seeing (and everyone on your instance knows to keep it that way), open the circle and pull up a seat!
For larger instances, the cost of an extra seat will be rendered proportionally insignificant, but security procedures, compartmentalization, user permissions, and management will become a more important and cumbersome task.
How to give someone access to Jira
- Set up Jira permission schemes to restrict project access to specific groups, project roles, and users.
- Configure default group membership when you add a new user.
- Configure default project role membership when you create a new project.
- Deactivate user accounts whenever someone leave.
Pros
Everyone has access to Jira issues, dashboards, and reporting, and can use all the same apps your teams use.
Cons
Smaller instances may have to consider the costs before they upgrade their user tier. Setting up permission schemes requires a lot of technical work, and requires the system to be completely air-tight. A single misconfigured project could allow users to see restricted data.
Who it’s best for
Teams with full-time Jira admins with technical skills, strictly followed processes, and the time to set up every project’s permissions properly. You’ll also need to be confident everyone in your organization is following your procedures.
It will require time scheduled for user management and a process to remove people’s access as required.
This is the best approach for an organization with a big Jira instance, best-practice processes set up, and a good training program in place for anyone that’s looking to share access with a small number of trusted external users.
Option 2: Exalate – mirror your Jira!
The Exalate app makes it possible to run a real-time clone of every part of your Jira instance, using a uni-directional or bi-directional integration. There are also options for whether to share custom fields or attachments.
This is the mother of all collaboration solutions, especially if you’re looking to clone and integrate multiple instances of Jira, ServiceNow, Zendesk, and Github merged onto one platform.
Security considerations
You will lose a lot of oversight on what the other side is doing with your data. This is fine when you trust them. Your teams must remember to only share the right things, and remove access at the appropriate time, as everyone on both instances will need to remember they’re sharing externally, as well as potentially housing someone else’s data.
How to set up Exalate:
Exalate offer a detailed step by step guide: how to synch two Jira instances using Exalate .
But the TL;DR version is:
- Map a workflow that works for both teams. The workflows don’t have have to be identical, but you will have to map how they work, and what changes in one mean for the other.
- Choose the most appropriate option from one of their many templates, about what you want to share, and what you don’t.
- Install Exalate on both instances.
- Exalate each issue you want to copy.

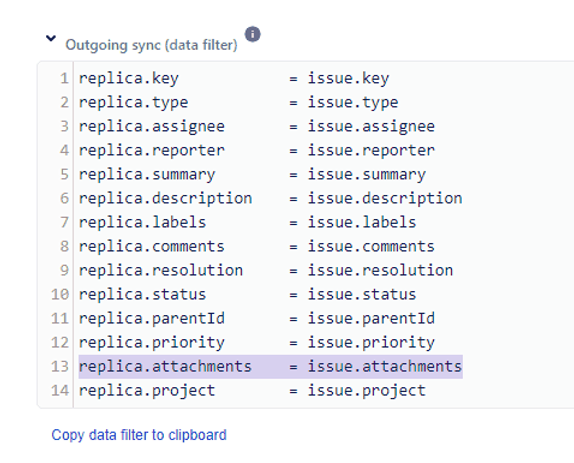
5. Customize Jira synchronization rules through scripting, as below.
6. If any errors occur, you can always seek assistance from the Exalate team.
Pros
Backup! All things are duplicated, and you have two teams singing off of the same hymn sheets. If you have Jira, ServiceNow, Zendesk, or Github, this is the way to have a cross-platform single source of collaboration promised land, all merged into one place.
Cons
You’ll need two instances of Jira, and both must have the app installed. This won’t suit all budgets, especially if you won’t get value from all of the features and integrations.
It also requires work to ensure the integrations are set up properly, especially if the two instances have heavily customized workflows and different apps. You’ll also need to do basic coding and maintenance to get the replica data filter processors working. Finally, you’ll need to ensure reporting is done on both instances.
Who it’s best for:
Companies with a small, purpose-built instance that want to collaborate on projects with an outsourced development house or a branch in another country.
Option 3: External Share for Jira
Sometimes you only need to share a few issues with external users. That could be an individual contractor or consultant you’re not ready to hand the keys to the kingdom to yet. Sometimes it’s a specific issue you want to share with a customer, supplier, or even a sister/daughter company. Sharing limited information for a limited time with specific individuals would be hard, not to mention expensive, with native Jira or Exalate.
This is where External Share for Jira comes in. This tool lets you share a secure link to a single Jira issue with an external user, which they can see, comment on, and add attachments to.
Security considerations
Make sure admins understand the features. For example, the length all links are live can be restricted by default (e.g. 1 day or 1 week).
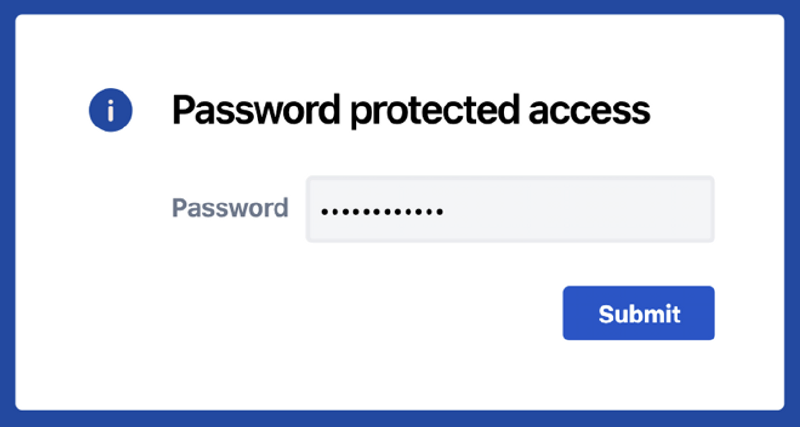
The links are read-only and use unguessable 16-character URLs. However, if security is a concern, you could also add password protection to links, so that only those with the password can access them.
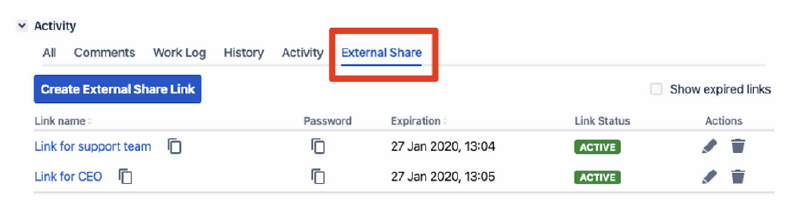
Admins should review how many links have been created, and remove or change sharing permissions as they see fit. It’s easy to turn links off and on again, or delete them as appropriate.
How to Externally Share your Jira
Here’s some detailed documentation explaining how to share external links to Jira tickets , but the short version is:
1.) While viewing an issue, click External Share.
2.) Choose which sharing options you want and click to send via email.
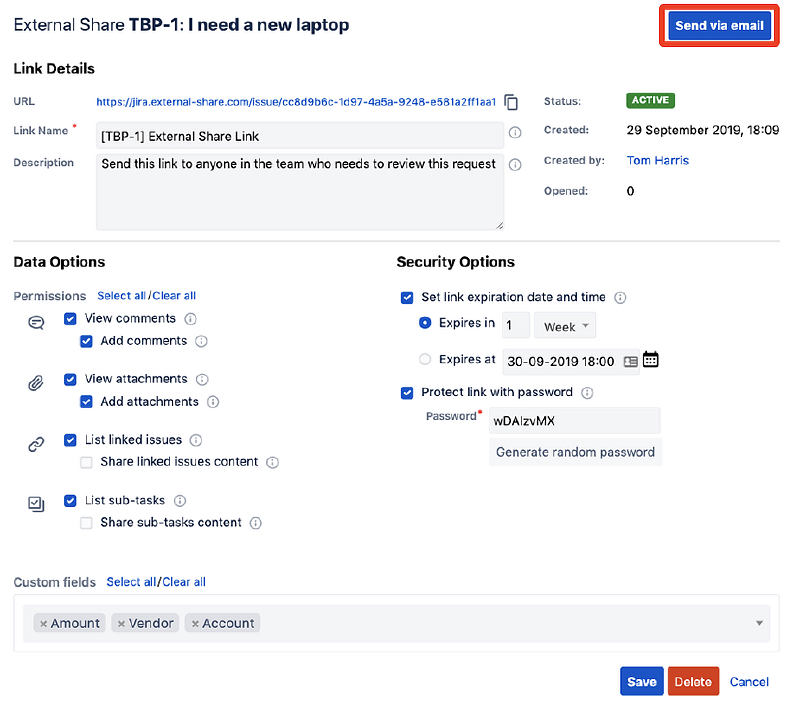
3.) If you’ve set a password, it’s good practice to send that separate to the link, following your own security procedures. They’ll have to enter the password to view the link.
4.) If you’ve enabled permissions to add comments and attachments, anyone with the link and password is now free to do so.
5.) You can review which links have been shared, and turn them off or delete them as needed.
Pros
It’s quick to set up and use and is a no-nonsense way to easily share specific issues with individual users securely.
Cons
It doesn’t have a lot of the advanced features of Exalate, so it’s more suited to sharing individual parent and child issues, rather than whole epics or instances.
Who it’s best for
Medium-sized companies that want an easy way to quickly share specific information with named individuals while retaining control and security over the rest of the information on their instance.
It can also be used to reduce Jira Service Management agent licenses by allowing non-agents to add public comments and attachments directly to issues.