Introducing Success & Rejection Steps
At Warsaw Dynamics, we are continually refining Approval Path based on our customers’ feedback, so we can make their workflow flawless. We have introduced Rejection Step previously, and now we have released the Success Step for both Approval Path for Jira and Confluence.
In this post, we will explain what these steps are, with some use cases, showing you how they can help Approval Path process more efficiently based on the application version for Jira. Before we begin, feel free to check our Success Step and Rejection Step for Jira documentation page.

What Are Success and Rejection Steps?
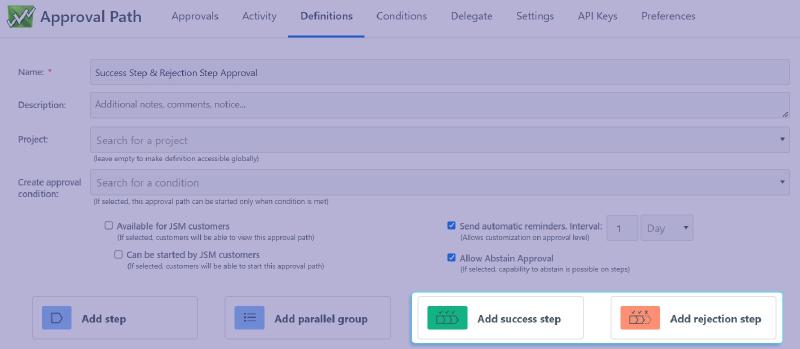
Success and rejection step enable automation for specific actions when an approval is either approved or rejected. As a global or project administrator, you can go to the Definitions tab, then from the definition level, click the “Add success step” or “Add rejection step” to customize your needs.

Why Did We Create Success and Rejection Steps?
Our development of Success and Rejection Steps was driven by feedback from our customers.
Users were struggling with manual process after the completion of approval process.
Customers hoped the issue’s status can be automatically set to the appropriate value in charge once an approval was approved or rejected.
It inspired us to create steps that automate what happens after an approval is completed.

Success and rejection step allows adding both Automation and Webhook action types.
With Automation, we provide below 5 category of customization.
• Change issue status
• Change a user assigned to a field
• Add a comment on an issue
• Add/remove label(s)
• Set entity property
For step-by-step guide how to utilize these options, check our guide on Automation documentation.
With Webhook, you can customize within a variety of selection.
You can make your own rule by adding components. In most cases, you will want to use the Jira Automation, which allows automation of repeating tasks and processes in Jira without the need to write code. Possible action includes creating new issues or updating existing ones (e.g., changing status, assigning a user, adding a comment), or sending emails or notifications to users or groups.
You can also connect to a third-party system that supports REST APIs,
enabling seamless automation and interaction between different platforms.
For example, using Slack API, you can send messages to specific channels based on the approval status of Jira issues,
or use the Salesforce API to synchronize Jira issues with Salesforce records.
We will explain this in more detail in the upcoming Use Case section.
Available
Webhook documentation
is here, check how to set up Webhook for Jira!
Example Use Cases
We have prepared some use cases that demonstrate how Success and Rejection Steps can improve your workflow.
Since these steps occur after the approval process, they provide clarity on what happens next, helping the person to grasp the next steps.
By using steps, you are not only speeding up the workflow but also adding convenience to the process!
If you’d like to learn more or share your creative ideas,
feel free to contact our
Warsaw Dynamics support team!
1. Issue Transitions - Automatically update the status!
In a busy Jira board, various issues are approved and rejected daily. Don’t you want to change the status of the issue automatically after the approval process is complete, so relevant parties can immediately take necessary actions?
Let’s say you are working on an issue and it gets rejected. From here, the status can automatically change to “Declined,” signaling that it needs review. You can customize it by using Automation - Change issue status function.
Before we launched the success and rejection steps, the only option to perform this process was to use a webhook step as the last in the definition. Unfortunately, it often conflicted with Jira workflow transitions. Now, with success and rejection steps, you can automatically change the issue’s status without relying on a webhook!
2. Assignee Transitions - Based on approval outcomes, assignee might change
With Automation - Change a user assigned to a field function, it’s possible to reassign issue owners based on the outcome of an approval.
For example, consider a price-filing team that creates spreadsheets attached in the issue for review by the finance team. Once an issue is approved, it can be automatically reassigned to the Finance team for implementation. If rejected, it will be reassigned back to the pricing team for further revisions.
Without success and rejection steps, this process could lead to confusion or require manual effort, with team members unsure of who should handle the issue next. Assignee Transitions shows that right person is assigned based on approval status, avoiding delays or miscommunication.
3. Slack Collaboration - Keep stakeholders informed
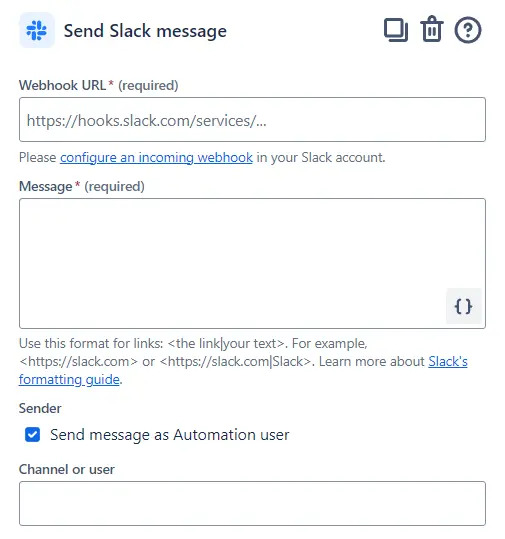
By using Webhook, you can automate slack messages to relevant stakeholders when an issue is approved or rejected.

In a large projects where every issues approval outcome should be informed to your customers or related parties, you can set up an automatic Slack message to notify the client, project manager, or other related ones. For example, when an issue transitions to the “Ready for Deployment” status, a message can be sent to the release channel, making sure that the team is updated in real-time.
When customizing Slack message, you’ll need to provide Webhook URL connected with Slack API, message content and channel or user.
4. Generating subtasks - Anticipate next steps based on approval outcomes
When an issue is rejected, it often requires follow-up actions, such as fixing errors or addressing feedback. But without a clear instruction of further step, team may waste time figuring out how to proceed or finding the right person to provide additional input.
Let’s take an example from a product development workflow.
If a feature fails testing, a subtask can be automatically created for the development team to fix the issue.
This avoids the risk of forgotten or overlooked tasks, and it makes sure that rejected issues lead directly to follow-up tasks.
This is a straightforward process that issues will create new tasks whether an issue is approved or rejected.
You can set this up by using Webhook.
5. Salesforce Integration - Synchronizing Jira issues with Salesforce
By integrating Salesforce with Jira using the
Salesforce REST API,
you can automate updates between platforms based on approval outcomes.
It can automatically sync Jira issue approvals with Salesforce records, such as opportunities or leads.
For example, when a customer service request in Jira is approved, an automated update is triggered in Salesforce,
updating the corresponding lead or opportunity.
Sales team will be instantly informed, and the process moves forward without manual intervention.
If you have curiosity on Automation function, It might be useful to check our previous blog post about Automation Step: Make Approval Path for Jira Processes Easier with Automation.
Do you want to try how Approval Path works with Success & Rejection step?
You can
Book a Live Demo here!


