SSO Verified Domains: External Share for Confluence

In this article, we are excited to introduce a new feature in the External Share for Confluence.
This feature allows you to verify a domain by adding a TXT record at the DNS level, which is generated by our tool.
After verifying that the record is set correctly on the domain, we are assured that the user who set up SSO also has access to the
designated domain. This allows users to skip email verification when registering with Single Sign-On (SSO).
If you want to know know what exactly SSO means and how it works, here is our Warsaw Dynamics documentation page:
SAML/SSO-Step Guide.
Our customers rightly expect only the best from us, which sometimes means simplifying our app’s user experience to feel as seamless as possible. Achieving this, while maintaining strong security, a top priority for our customers has been a challenge we’ve embraced and take pride in.
Recently, a customer mentioned that although the sign-up and login process for new users is easy, they have an internal requirement that
only SSO be used for user authentication.
They wanted users to access everything within the SSO framework without needing to manually create or confirm accounts, even in case of
automatic account creation.
This led us to develop a way for users authenticated through the SSO application, connected to External Share, to directly access the
content. This innovation takes SSO to the next level.
That’s when the idea of verifying user domains within the SSO scope came into play.
How Verified Domains Work in External Share
Here’s a step how the verified domains work in External Share for Confluence.
1. Adding a Verified Domain in Global Settings
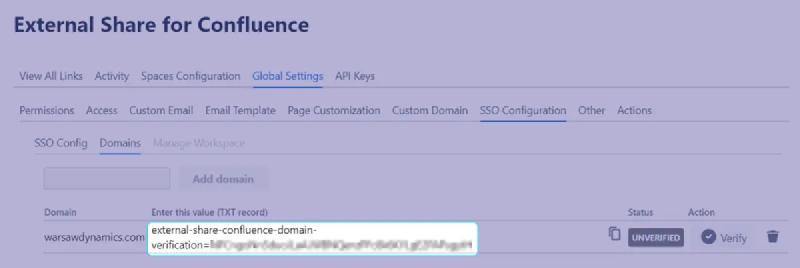
In External Share for Confluence, navigate to Global Settings → SSO Configuration → Domains. Here, you’ll find a form to add and save a valid domain that you want to verify for SSO purposes.

Global Settings → SSO Configuration → Domains
2. Generating a TXT Record for Domain Verification
Once you enter your domain name into the form, the system generates a unique TXT record for you.
TXT record will look something like:
external-share-confluence-domain-verification=44_letters_length_string_uuid_format.
This record is automatically created and stored in the global settings table with the domain’s status set to UNVERIFIED.

3. Updating Your DNS with the TXT Record
To verify the domain, you need to add the generated TXT record to your domain’s DNS settings. This step proves that you own the domain and are authorized to use it.
4. Verifying the Domain
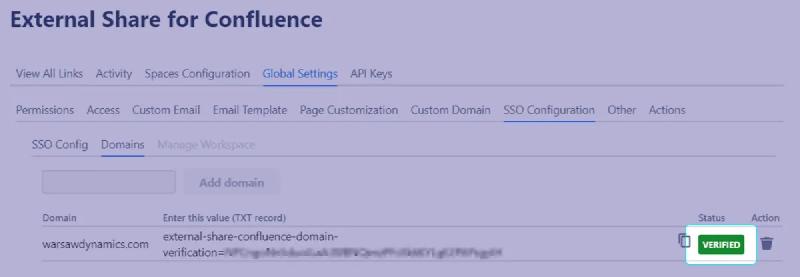
After adding the TXT record to your DNS settings, return to the Domains tab in External Share for Confluence and click the Verify button next to your domain. The system will check the DNS for the presence of the TXT record. If found, the domain status will change to VERIFIED.

5. Automatic User Registration via SSO
Once the domain is verified, any user registering via SSO associated with verified domain will have their status automatically marked as COMPLETED, without the need for the user to send a confirmation email and click on the link from the email. This process only applies to users within the SSO scope.
Why Use SSO Verified Domains?
-
Better User Experience: Users do not need to go through the usual email verification steps, making it easier and faster to start using the service.
-
Better Security: Accounts are automatically created for users within the SSO scope but users are still required to verify their accounts for access. This process gives a secure environment since we only grant verified users.
The SSO Verified Domains feature in External Share for Confluence is a tool to save time for user registration and maintain secure access via SSO. You can also find our documentation here regarding SSO Domain Verification.
Are you interested in External Share for Confluence? Try it out and experience how our solutions can improve your productivity while using verified domains, saving your time more than ever before. Book a demo of the app with our team!
Reach out to our support team with your questions and feedback – we’re excited to support you and opened to new feature requests and ideas!


